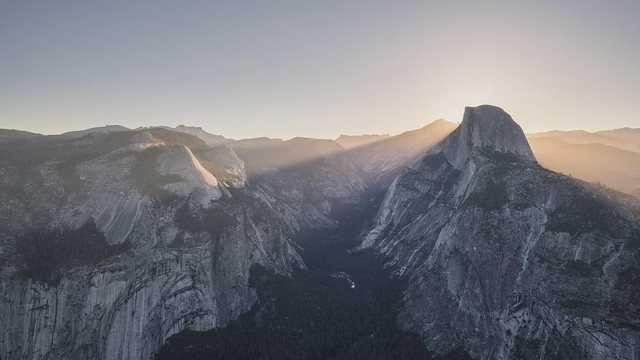
I went to Glacier Point in Yosemite for dawn two times in three days this June. That's no mean feat considering my campground was a two hour drive from the parking lot and if I remember right dawn was right after 6 am. The first day I was there I got up at 4:15 am and I missed sunrise but was able to see the sun break over Half Dome and shoot golden hour over Nevada Falls. So after getting up at 3:15 am my second try to make sure I got the beautiful pre-dawn colors I decided that rather than shooting that same things over again while the sun was breaking over Half Dome through golden hour that I'd try for a time lapse.
R5 | ISO 100 | EF 16-35 F/2.8 III | f/11 | 21 mm
1839 - 2 stop brackets centered at 1/60s, 1/80s, 1/100s, 1/125s, 1/160s, 1/200s (Big mistake on my part-explanation below)
60 fps
Total of 5517 images taken to make this video.
TL;DR:
From here on out the TL;DR is that an overconfident camera nerd tried something that shouldn't have worked but pretty much did. He shares his mistakes and how he'll set it up differently next time. Read on at your own risk.
The rest of this is more a nerdy story of how I winged the shot and still got a result that I'm pretty proud of. There are some things I'll do differently next time I attempt a time lapse of this magnitude and, for any who might be interested, I'll list those at the end, too.
Now I had put together a few simple time lapses before but always under pretty constant light and in fairly low dynamic range situations. The doctor once said that he was armed with "Overconfidence, this *pats bag*, and a small screwdriver. I'm absolutely sorted," and it was in this spirit that I plunged forward knowing that the worst that could happen was a bunch of wasted hard drive space and me standing around enjoying a magnificent sunrise in one of the most beautiful locations on the planet. Not much downside there.
I had my R5 with me and a 16-35 mm wide angle with me so I set my aspect ration in camera to 16:9, found a composition I liked, set up my auto exposure bracketing for 2 stop brackets, and went to my in camera intervalometer. Now, I had used my R5 enough to know that for some reason the good people at Canon think that no one will ever need an interval smaller than one second. Never mind that the camera can keep shooting 12 images per second until you fill your memory card and that in night photography 1 second gaps are way too long, but I digress. I also knew that Canon's current flagship body will only shoot all three frames of a set of bracketed images if a timer is used, with a 2 second timer being the shortest timer available. If you don't use a timer even with the built in intervalometer set at say 1 second intervals, you get a series of images all one second apart from each other that look like this, mid - 1 sec - dark - 1 sec - bright - 1 sec - mid - 1 sec - dark - 1 sec - bright - 1 sec - mid - 1 sec - dark - 1 sec - bright - 1 sec, etc. etc. I've accidently shot that time lapse before and I'm here to tell you it's a pretty worthless and frustrating series of images. Now, as my former students will attest, I do struggle with addition sometimes, but that seems to me that the shortest interval you can get with a Canon R5 when taking an HDR time lapse is 3 seconds between shots. So that's what I picked. By the way, I'd love to be proven wrong about these two things. If anyone has a way around either the min 1 second interval or the timer required to shoot brackets, please educate me!!
So far so good, and I'd do things that way again. Now begins the era of error. I left the camera in manual. I used pretty standard landscape settings. ISO 100, f/11, and let the shutter speed do what it will since there wasn't any wind to speak of and nothing was going to be moving in my composition anyway. Now, you're probably laughing at me by now because you're probably in possession of the secret knowledge that eluded me and my sleep deprived mind that morning. When the sun rises, things get brighter. If things get too bright the image blows out the highlights and you get a nasty image. So, when the sun rose I was frantically working to manually adjust my shutter speed to keep the histogram on the back of the camera looking decent without bumping the camera and ruining the time lapse. (Note that stopping and starting again wasn't an option because that would have created an uneven gap between images that would have looked horrible.) Standing there, I knew that smoothing these manual exposure changes out was going to be a headache down the road but in that kind of situation you just keep solving problems as best you can as they pop up and hope it all works out in the end. Oh, and the timing had to be pretty close to perfect to roll the shutter wheel between shots because the shot had to have ended, but the intervalometer couldn't have triggered the next shot yet or it ignored the change.
Anyway, after almost 2 hours had passed, I had my 5517 images (1839 sets of 3 shot brackets) and drove the two hours back to the campground.
Fast forward from June to August when I finally got down to trying to process this time lapse. Now first let me say I invested in Michael Shainblum's time lapse course and it's well work it! I look forward to finishing it and learning so many more techniques. He recommends a program called LRTimelapse for smoothing out transitions. Now it took me 8 different tries and more hours exporting jpegs and rendering video than I care to admit, to get the keyframes set the way I wanted, but I'm pretty happy with this result. I took a bunch more time lapse raw data on my recent 3 month road trip and I'm really looking forward to using what I learned processing this one to tackle them, too!
So what I plan to do differently next time is to use aperture preferred mode instead of manual. Set the exposure compensation where I want it, and limit the auto ISO and shutter speeds to reasonable levels. This will greatly reduce the need for key frames every time you change the exposure. Should take a time lapse like this one from the 14 I had to edit to something like 3-5. It will also allow me to use LRTimelapse's deflicker feature much more effectively. With the manual discontinuities in the exposure over time the deflicker algorithm actually introduced large problems around those manual changes.
If anyone actually read all this and is interested in creating these kinds of shots I hope it helps point you in the right direction and remember my biggest recommendation is to buy Michael Shainblum's time lapse course! (No affiliation and I paid full price. Just bragging on a tool I found useful.)